Sometimes, due to some viruses or worms, your system may disable the right click context menu.
That is, nothing happens when you right click on any place.
Use this steps only after removing all viruses and bugs from your computer. Otherwise, this method may not work.
Steps to resolve:
1. From the Start menu, select Run.
Type gpedit.msc and click OK.
2. Get to this location:
User Configuration > Administrative templates > Windows Components > Windows Explorer
3. In the right pane double click on:
Remove Windows Explorer's default context menu
4. Select Disable and click OK.
Make Hard Drive Inaccessible
Just use the following trick to make the c drive inaccessible when you click on the drive.
Procedure:
Go to the registry editor and navigate to the following place:
HKEY_CURRENT_USER\Software\Microsoft\Win\CurrentVersion\Policies\Explorer
In the right hand pane for the Explorer key, create a new "DWORD" value named ViewNoDrive
Double click the new value and enter it as .......
for hiding A drive set value as 1 , for B its 2 and C its 4 and so on and for Z its 33554432
Generally multiply it by 2 for the next alphabet to hide
Once done, reboot or log off and login in again.
Then try double clicking the drive you made inaccessible.
You should receive a message stating that the drive cannot be accessed.
How to Enable Hidden Files Option?
Most of us have this problem Sometimes when virus attack our computer it disable the "Show hidden files and folders" option than even if we select the option Show hidden files and folders from the folder option window, the changes just disappear upon closing the dialog. It is because virus has attacked your registry file.
So, here is the solution to the problem:
Go to Run than type regedit and click Ok.
Find the key:
HKEY_LOCAL_MACHINE\SOFTWARE\Microsoft\Windows\CurrentVersion\Explorer\Advanced\Folder\Hidden\SHOWALL
Look at the "CheckedValue" key.
This should be a DWORD key.
Check its value if it is not 1 than make it 1.
If "CheckedValue" key is not there, create a new key called "CheckedValue" as a DWORD (hexadecimal) with a value of 1.
Open My Computer on the toolbar. Go to Tools > Folder Option and click on the View tab. Now, the "Show hidden files & folders" should work properly.
Make Your System Speak
This is a simple trick for making your system speak although this is an old trick, yet it is discussed here for those people who don't know about it. Here is the trick to convert your TEXT to VOICE without any software..
go to run>type Control speech >write any text
it will be converted to voice.
IT'S FUN..
go to run>type Control speech >write any text
it will be converted to voice.
IT'S FUN..
Shutdown at a Particular Time
Every day we are in the hurry and need to stop the system at a particular time. Now, here is the tip which can shut down your computer at a fixed time. All you have to do is to follow the simple trick found here. I hope that this will help. Leave your comments here.
Procedure:
1) Right click on your desktop and choose "New=>shortcuts".
2) In the box that says "Type the location of the shortcut"
type "shutdown -s -t 100" without the quotation marks and click next.
(100 is time in second, you can give any value for that)
3) Give a name for the shortcut.
4) Double click to activate timer.
TO ABORT: (while the timer is running)
1) Create another shortcut and make the "location of the shortcut" to "shutdown -a" without the quotes.
2) Double click to deactivate timer.
Customize the System Tray
You can add your name or anything you like that consists of 8 characters or less. This will replace the AM or PM next to the system time.
1. Open RegEdit
2. Go to HKEY_CURRENT_USER\Control Panel\International
3. Add two new String values, "s1159" and "s2359"
4. Right click the new value name and modify. Enter anything you like up to 8 characters.
If you enter two different values when modifying, you can have the system tray display the two different values in the AM and PM.
Convert PDF Files to Text
This software is used to convert PDF files into text files. The software is pdf zilla and it can be downloaded from http://www.pdfzilla.com/zilla_pdf_to_text_converter.html
PDF zilla is a free ware. The software converts the files in batch process. All we have to do is to drag the files into the software which need to be converted. All the files will be sent to the output directory.
PDF zilla is a free ware. The software converts the files in batch process. All we have to do is to drag the files into the software which need to be converted. All the files will be sent to the output directory.
Make Free Calls to 40 Countries
With tuitalk™, you can make free international phone calls from anywhere in the world to over 40 countries. Your phone calls will be free since they are sponsored by advertising. The person you are calling doesn't need to be on a computer. You can call their landline or mobile phone directly. Join tuitalk™ today and enjoy your three free calls every day.
What do you need?
Just Windows Mobile Phone, an iPhone or a PC with speakers/headphones and a microphone.
How it works?
1. Join tuitalk
2. Download tuitalk
3. Dial the #, watch an ad then talk for free.
For more information on this see here: http://www.tuitalk.com/index.zhtml
What do you need?
Just Windows Mobile Phone, an iPhone or a PC with speakers/headphones and a microphone.
How it works?
1. Join tuitalk
2. Download tuitalk
3. Dial the #, watch an ad then talk for free.
For more information on this see here: http://www.tuitalk.com/index.zhtml
Speed Up Your Mobile by 50%
This is only for those users which have memory card in their phones. First of all, you will need;
- a computer,
- a USB connectivity of MEMORY CARD TO PC(CARD READER) NOT BLUETOOTH.
Follow these steps:
1. Remove memory card from mobile.
2. Insert it in CARD READER.
3. OPEN start menu>All programs>accessories>system tools>DISK DEFRAGMENTER
4. Just run defragmenter at your memory card.
5. FRAGMENT IT 2 OR 3 TIMES.
6. PUT back memory card to phone.
7. ENJOY THE "SPEED."
Increase CD Writer Speed
Open My Computer.
Right-click the CD Drive icon.
Click "Properties".
Click the Recording tab to display the settings.
Under "Select a write Speed" Choose the "Fastest".
If still having a problem, then choose a speed like 18x or a medium speed. This will resolve almost all the issues.
Right-click the CD Drive icon.
Click "Properties".
Click the Recording tab to display the settings.
Under "Select a write Speed" Choose the "Fastest".
If still having a problem, then choose a speed like 18x or a medium speed. This will resolve almost all the issues.
Hide Any File in JPG
1. Gather the file you wish to hide and the image file. Place them in a same folder.
2. Add the file/files to a archive[.zip or .rar] by WinRar
3. Open command prompt by going to Start > Run > cmd
4. In Command Prompt, navigate to the folder where your two files are located (i.e. the image and .rar file). You can do this by typing "cd location" (eg: cd C:\New Folder)
5. Type: "copy /b [old image] + [file] [new image]"
Congratulations! As far as anyone viewing is concerned this file looks like a JPEG, acts like a JPEG, and is a JPEG, yet it now contains your file.
In order to view/extract your file, there are two options that you can take:
a) Change the file extension from fluffy.jpg to fluffy.rar. Then open it. Your file is there.
b) Leave the file extension as is. Right click. Open it with WinRar.
Here is an example:
let files to be hide are
1. abc.flv
2. xyz.txt
3. blah.blah
......
Add these files to an archive, let's say, secret.rar and the image file named, let's say, image.jpg.
These files are now in C:\New folder
Go to "C:\new folder"
Type "Copy /b image.jpg+secret.rar new.jpg"
Now, we got a new jpg file named as new.jpg which will totally act like a jpg file.
Extracting your files:
a) Rename new.jpg to new.rar and extract it.
b) Right click on new.jpg. Open with winRAR.
100% Safe Children's Web Browser
The Internet is a great tool. But it is also filled with tons of spam and inappropriate content. As a parent I've always been fighting the Internet and blocking off sites so my kids can't reach them. The great thing about SecuriNu's Internet browser is how it works.
It's not like any other safe web browser where you just block off the sites which you don't want your kids viewing (but there's too many to handle). It allows you to set your own settings on what is acceptable and what is not for your children. It also allows you to add websites you'll allow your children to view. Right from the start the program puts you in control and no one else. It's never been beat in our house and my children have definitely tried as I've seen the settings tempered with.
Once you have configured the software and changed all the default settings to be customized and work how you'd like them to, and you've added all the websites you'll allow your children to view, you can put SecuriNu into "Lockdown Mode". The software automatically fills the screen and disables task manager. So, children are not able to close the browser. They say that it's the Nu Era of child security online and I don't doubt it.
Their support was super friendly and helpful and installation only took a few minutes. I'm not an internet guru but I found their user control panel as very easy to use and highly effective. I've customized everything I could imagine. Best of all, I have piece of mind knowing my children are using our family computer. The price is very affordable since it's a one-time payment and you get to use it for life. All the free updates and upgrades included. Any parent who wants to know their child is safe and secure on the Internet will want to buy this for their family to have internet safety kids all the time.
How to Block Websites without Software?
Steps:
1. Browse C:\WINDOWS\system32\drivers\etc
2. Find the file named "HOSTS"
3. Open it in notepad
4. Under "127.0.0.1 localhost" Add 127.0.0.2 www.sitenameyouwantblocked.com and that site will no longer be accessible.
5. Done!
So;
127.0.0.1 localhost
127.0.0.2 www.blockedsite.com
-->www.blockedsite.com is now inaccessible<--
For every site after that you want to add, just add "1" to the last number in the internal ip (127.0.0.2) and then the addy like before.
Examples:
127.0.0.3 www.blablabla.com
127.0.0.4 www.blablabla.com
127.0.0.5 www.blablabla.com
To Check Your Antivirus Is Working Properly
Try at your own risk....
I did try this. My antivirus alerted and deleted the file..
Open notepad
Copy this code in the text file....
"X5O!P%@AP[4\PZX54(P^)7CC)7}$EICAR-STANDARD-ANTIVIRUS-TEST-FILE!$H+H*"
without quotes....
Then save it with the name fakevirus.exe
If this file got deleted immediately that means your antivirus is working and updated..
Hiding Your Folder in a Different Way
- Right click on the desktop to create a new folder.
- Rename the folder with a space (you have to hold ALT key and type 0160). Now you've got a folder without a name.
- Right click on the folder>properties>customize. Click on change icon.
- Scroll a bit, you should find some empty spaces. Click on any one of them. Click ok.
That's it. Now you can store your personal data without any 3rd party tools..
You can also hide your folder by this method:
Open Start>Run>CMD
now type attrib +s +h C:/name of d folder you want to hide
Now even in the folder option Show all Hide folders is selected still you will get this folder hide...
And not to hide, type same command juzz put "-" instead of "+"
Free Mobile Games Download
The following are the list of sites where you can find the mobile related stuff for free. Here goes the links: http://bestdownload.weebly.com
- All mobiles games: http://mobimaza.com/mgames.html
- Latest games: http://free-mobile-games.mobilclub.org/redir-games-r-0-1
- Best games: www.mobile9.com
- http://www.mobileheart.com/cell-phone-games/java-series-games-32.aspx
- http://www.emobilez.com/games
- http://www.mobileplayground.co.uk/
- Samsung mobile games free downloads: http://www.mobilerated.com/free-samsung-games.html
- http://midlet.org/category.jsp;jsessionid=1c1xxcecpm0o7?parentlevel=1
- Latest 2009 games: http://www.cell11.com/
- http://www.shabugames.com/mobile_games/index.html
- Mobile and ipod games: http://www.emobilez.com/mobile_games
Restricting Logon Access
If you work in a multiuser computing environment and if you have a full (administrator level) access to your computer, you might want to restrict any unauthorized access to your "sensitive" files under Windows 95/98
One way is to disable the Cancel button in the Logon dialog box.
Just run Regedit and go to:
HKEY_LOCAL_MACHINE/Network/Logon
Create the "Logon" subkey if it is not present on your machine: highlight the Network key -> right-click in the left hand Regedit pane -> select New -> Key -> name it "Logon" (no quotes) -> press Enter. Then add/modify a DWORD value and call it "MustBeValidated" (don't type the quotes). Double-click it, check the Decimal box and type 1 for value.
Now click the Start button -> Shut Down (Log off UserName) -> Log on as a different user, and you'll notice that the Logon Cancel button has been disabled.
Increase Airtel GPRS Speed 4 MO:
This trick is about how to increase the speed of airtel dsl DNS servers. We will experience an increased speed in gprs and airtel broadband connections. It sometimes take about 4 seconds for a query or it gets timed up due to the overload of the airtel server.
I have just started using Open DNS server - which is a free and powerful DNS service. Use following DNS server address:
Code:
Preferred DNS server: 208.67.222.222
Alternate DNS Server: 208.67.220.220
HOW TO DO THIS:
1. Click on Start button > Settings > Control Pannel> Network Connections
2. Right click on YOUR "airtel dialup connection" or your internet connection,
Click on Properties button.
3. Select Internet Protocol (TCP/IP) in general TAB
4. Click on Properties button and Look for Preferred DNS Server:
5. Enter the following values there,
- 208.67.222.222
- 208.67.220.220
AND KEEP....OBTAIN IP ADDRESS AS AUTOMATIC.
6. Save and close the windows. If you are using old version of windows you may need to reboot the system...
To test new setting go to Start > Run > Type cmd
Type nslookup command
Now type domain name
google.com
Now experience good speed, better than previous.....................ENJOY!
Other most popular free DNS server IP's for fast internet connections:
4.2.2.1
4.2.2.2
4.2.2.3
4.2.2.4
4.2.2.5
4.2.2.6
NOTE: Replacing your DNS with unknown IP's may let your system get infected by harmful sites since DNS servers resolve websites' IP addresses which you want to visit. When you type google.com at the address of your browser, your DNS will resolve the IP of google.com. If you don't use a reliable DNS, you might visit a malware site although you type "www.google.com" at your browser's address bar.
How to Format USB Drives Using NTFS ?
Well am sure you computer freaks know the difference between NTFS and FAT format..
NTFS is a New Technology File System.. meaning its performance is way better than FAT (File Allocation Table) Our USB drives/ Flash Drives are by default formatted on FAT.. therefore transferring file to your USB often takes some time.. You can change the format type by formatting - everyone knows that
- but Windows XP does not provides NTFS format for USB drives by default.. You have to enable this option.. How? Follow these steps:
->Plug in your USB drives
->press win+r to open run dialog box.. type sysdm.cpl and press enter
->Goto to Hardware tab -> Device manager
->double click on Disk Drives.. Right click on the name of your USB drive.. Click on properties
->Goto to POLICIES tab. There will be two options
1)Optimize for quick removal (which will be selected by default)
2)Optimize for performance.
Select optimize for performance.. Close the properties.. Format your USB drive..
In the format dialog box.. click on Fie sytem.. a drop down box will open up.. select NTFS..
For allocation unit size, select Default allocation size.. Check the quick format box.. and format..
Voila.. you're done..!!
Now transfer files to your usb you'll surely notice some change in the speed..!!
Note: In Vista you can format your USB using NTFS file system by default.. This is just for Windows XP users..!!
How to Enable Task Manager?
Method-1:
Change Task Manager through a Registry REG file
Click on Start, Run, and type Notepad and press Enter
Copy and paste the information between the dotted lines into Notepad and save it to your desktop as taskmanager.reg
------------------------------------
Windows Registry Editor Version 5.00
[HKEY_CURRENT_USER\Software\Microsoft\Windows\CurrentVersion\Policies\System]
"DisableTaskMgr"=dword:00000000
Double click on the taskmanager.reg file to enter the information into the Windows registry
Method-2:
Delete the restriction in the registry manually
Click on Start, Run, and type REGEDIT and press Enter
Navigate to the following branch
HKEY_CURRENT_USER \ Software \ Microsoft \ Windows \ CurrentVersion \ Policies\ System.
Method-1: Using the Group Policy Editor in Windows XP Professional
Click Start, Run, type gpedit.msc and click OK.
Under User Configuration, Click on the plus (+) next to Administrative Templates
Click on the plus (+) next tSystem, then click on Ctrl+Alt+Delete Options
Find Remove Task Manager in the right-hand pane and double click on it
Choose the option "Not Configured" and click Ok.
Close the Group Policy Window
Method 2: Change the Task Manager Option through the Run line
Click on Start, Run and type the following command exactly and press Enter
REG add HKCU\Software\Microsoft\Windows\CurrentVersion\Policies\System /v DisableTaskMgr /t REG_DWORD /d 0 /f
Editing Windows Through Explorer.exe
Explorer.exe is the file that controls almost the entire look, feel and functioning of the Windows Operating System. It is the file that holds the key to customizing Windows completely to suit one's personal preferences and likes. It is also possible to edit the explorer.exe file by following these steps:
1) The first step before starting to edit the explorer.exe file is to restart the computer in the command line mode. So, restart your computer
2) Once you have restarted the system in the command line mode, you should be in the same working directory as the explorer.exe file, which is generally the Windows root directory:
C:\>cd windows
3) Open the explorer.exe file in the MSDOS editor with the help of /70 parameter which basically means that the editor window shall open with 70 columns on each line:
C:\windows>edit/70 explorer.exe
4) The explorer.exe file shall now open in a blue screen containing large amounts of unrecognizable characters and a few recognizable characters as well. For each character that is displayed in the screen, the corresponding value and Line numbers are displayed on the status bar at the bottom of the screen.
5) Scroll down and edit those parts of the explorer.exe file that contain recognizable text, in order to edit a variety of different aspects of the look & feel of the Windows Operating system. Although editing is not too difficult, it is also handy to keep the following facts in mind:
a) Ensure that the total number of characters in the explorer.exe file must always remain the same to avoid corruption of the operating system. Hence one must remain very careful against accidental deletion, modification or addition while editing the file.
b) The explorer.exe file has a number of spaces throughout its body. However, it is important to note that these spaces are different from the spaces normally created by the spacebar. The value of the explorer.exe space is 0, while the value of the space created by the spacebar is 32.
c) Each ampersand sign (&) in explorer.exe signifies that the next character in the file shall appear underlined in the Windows operating system and is commonly used as a keyboard shortcut to execute that particular option.
d) Normally, when you right click on the Windows desktop taskbar, a pop up context menu containing various options (like Properties, Always on top, Auto hide) are displayed on the screen. It is possible to modify the context menu by scrolling down to the 1300 – 1400 lines of the explorer.exe file.
e) To edit the context menu options that appear when you right click on the Clock present at the bottom right corner of the screen, scroll down to the lines starting at 2300.
f) To edit start menu options including the text that appears on the Start button, scroll down to the lines starting at 2300.
NOKIA 3110 / 5110 / 5120 / 5130 / 5190
NOKIA3110
IMEI number: * # 0 6 #
Software version: * # 0 0 0 0 # or * # 9 9 9 9 # or * # 3 1 1 0 #
Simlock info: * # 9 2 7 0 2 6 8 9 #
NOKIA 3330
*#06#
This will show your warranty details *#92702689#
*3370#
Basically increases the quality of calling sound, but decreases battery length.
#3370#
Deactivates the above
*#0000#
Shows your software version
*#746025625#
This shows if your phone will allow sim clock stoppage
*4370#
Half Rate Codec activation. It will automatically restart
#4370#
Half Rate Codec deactivation. It will automatically restart
Restore Factory Settings
To do this simply use this code *#7780#
Manufacturer Info
Date of Manufacturing *#3283#
*3001#12345# (TDMA phones only)
This will put your phone into programming mode, and you'll be presented with the programming menu.
2) Select "NAM1"
3) Select "PSID/RSID"
4) Select "P/RSID 1"
Note: Any of the P/RSIDs will work
5) Select "System Type" and set it to Private
6) Select "PSID/RSID" and set it to 1
7) Select "Connected System ID"
Note: Enter your System ID for Cantel, which is 16401 or 16423. If you don't know yours, ask your local dealer for it.
8) Select "Alpha Tag"
9) Enter a new tag, then press OK
10) Select "Operator Code (SOC)" and set it to 2050
11) Select "Country Code" and set it to 302 for Canada, and 310 for the US.
12) Power down the phone and power it back on again
ISDN Code
To check the ISDN number on your Nokia use this code *#92772689#
NOKIA5110/5120/5130/5190
IMEI number: * # 0 6 #
Software version: * # 0 0 0 0 #
Simlock info: * # 9 2 7 0 2 6 8 9 #
Enhanced Full Rate: * 3 3 7 0 # [ # 3 3 7 0 # off]
Half Rate: * 4 7 2 0 #
Provider lock status: #pw+1234567890+1
Network lock status #pw+1234567890+2
Provider lock status: #pw+1234567890+3
SimCard lock status: #pw+1234567890+4
NOKIA 6110/6120/6130/6150/6190
IMEI number: * # 0 6 #
Software version: * # 0 0 0 0 #
Simlock info: * # 9 2 7 0 2 6 8 9 #
Enhanced Full Rate: * 3 3 7 0 # [ # 3 3 7 0 # off]
Half Rate: * 4 7 2 0 #
IMEI number: * # 0 6 #
Software version: * # 0 0 0 0 # or * # 9 9 9 9 # or * # 3 1 1 0 #
Simlock info: * # 9 2 7 0 2 6 8 9 #
NOKIA 3330
*#06#
This will show your warranty details *#92702689#
*3370#
Basically increases the quality of calling sound, but decreases battery length.
#3370#
Deactivates the above
*#0000#
Shows your software version
*#746025625#
This shows if your phone will allow sim clock stoppage
*4370#
Half Rate Codec activation. It will automatically restart
#4370#
Half Rate Codec deactivation. It will automatically restart
Restore Factory Settings
To do this simply use this code *#7780#
Manufacturer Info
Date of Manufacturing *#3283#
*3001#12345# (TDMA phones only)
This will put your phone into programming mode, and you'll be presented with the programming menu.
2) Select "NAM1"
3) Select "PSID/RSID"
4) Select "P/RSID 1"
Note: Any of the P/RSIDs will work
5) Select "System Type" and set it to Private
6) Select "PSID/RSID" and set it to 1
7) Select "Connected System ID"
Note: Enter your System ID for Cantel, which is 16401 or 16423. If you don't know yours, ask your local dealer for it.
8) Select "Alpha Tag"
9) Enter a new tag, then press OK
10) Select "Operator Code (SOC)" and set it to 2050
11) Select "Country Code" and set it to 302 for Canada, and 310 for the US.
12) Power down the phone and power it back on again
ISDN Code
To check the ISDN number on your Nokia use this code *#92772689#
NOKIA5110/5120/5130/5190
IMEI number: * # 0 6 #
Software version: * # 0 0 0 0 #
Simlock info: * # 9 2 7 0 2 6 8 9 #
Enhanced Full Rate: * 3 3 7 0 # [ # 3 3 7 0 # off]
Half Rate: * 4 7 2 0 #
Provider lock status: #pw+1234567890+1
Network lock status #pw+1234567890+2
Provider lock status: #pw+1234567890+3
SimCard lock status: #pw+1234567890+4
NOKIA 6110/6120/6130/6150/6190
IMEI number: * # 0 6 #
Software version: * # 0 0 0 0 #
Simlock info: * # 9 2 7 0 2 6 8 9 #
Enhanced Full Rate: * 3 3 7 0 # [ # 3 3 7 0 # off]
Half Rate: * 4 7 2 0 #
Nokia Universal Codes
These Nokia codes will work on most Nokia mobile phones:
(1) *3370# Activate Enhanced Full Rate Codec (EFR) - Your phone uses the best sound quality but talk time is reduced my approx. 5%
(2) #3370# Deactivate Enhanced Full Rate Codec (EFR) OR *3370#
(3) *#4720# Activate Half Rate Codec - Your phone uses a lower quality sound but you should gain approx 30% more Talk Time.
(4) *#4720# Deactivate Half Rate Codec.
(5) *#0000# Displays your phones software version.
1st Line : Software Version
2nd Line : Software Release Date
3rd Line : Compression Type.
(6) *#9999# Phones software version if *#0000# does not work.
(7) *#06# For checking the International Mobile Equipment Identity (IMEI Number).
(8) #pw+1234567890+1# Provider Lock Status. (use the "*" button to obtain the "p,w" and "+" symbols).
(9) #pw+1234567890+2# Network Lock Status. (use the "*" button to obtain the "p,w" and "+" symbols).
(10) #pw+1234567890+3# Country Lock Status. (use the "*" button to obtain the "p,w" and "+" symbols).
(11) #pw+1234567890+4# SIM Card Lock Status. (use the "*" button to obtain the "p,w" Go to Top and "+" symbols).
(12) *#147# (vodafone) this lets you know who called you last.
(13) *#1471# Last call (Only vodofone).
(14) *#21# Allows you to check the number that "All Calls" are diverted to
(15) *#2640# Displays security code in use.
(16) *#30# Lets you see the private number.
(17) *#43# Allows you to check the "Call Waiting" status of your phone.
(18) *#61# Allows you to check the number that "On No Reply" calls are diverted to.
(19) *#62# Allows you to check the number that "Divert If Unreachable (no service)" calls are diverted to.
(20) *#67# Allows you to check the number that "On Busy Calls" are diverted to.
(21) *#67705646# Removes operator logo on 3310 & 3330.
(22) *#73# Reset phone timers and game scores.
(23) *#746025625# Displays the SIM Clock status, if your phone supports this power saving feature "SIM Clock Stop Allowed", it means you will get the best standby time possible.
(24) *#7760# Manufactures code.
(25) *#7780# Restore factory settings.
(26) *#8110# Software version for the nokia 8110.
(27) *#92702689# Displays - 1.Serial Number, 2.Date Made, 3.Purchase Date, 4.Date of last repair (0000 for no repairs), 5.Transfer User Data. To exit this mode you need to switch your phone off then on again. ( Favourite )
(28) *#94870345123456789# Deactivate the PWM-Mem.
(29) **21*number# Turn on "All Calls" diverting to the phone number entered.
(30) **61*number# Turn on "No Reply" diverting to the phone number entered.
(31) **67*number# Turn on "On Busy" diverting to the phone number entered.
(32) 12345 This is the default security code. Press and hold # Lets you switch between lines
Save Online Flash Games to Your PC
Using this tip you can play the online flash games offline, just by saving.
1) Open Mozilla Firefox.
2) In the game window, after the game has completed the loading process, click Tools> Page Info and go to the media tab.
3) Under media, scroll down to see the embedded media file with a .swf extension. normally the file name is given in italics.
4) Select that and click save as and save it to the desired location.
5) Then to open it, right click the file in its location and select open with.
6) Select firefox and enjoy ur game offline!! :)
Shutdown Your Computer with Your Mobile
Hello friends here is a tip to close the computer with the help of your mobile phone. So, this is how you do this:
1. First, you need the batch files to perform the Shutdown, Hibernate etc. Create them on your own by the following method
2. Open your Notepad and write like this...
c:\windows\system32\shutdown -s -f -t 00
and save it as shutdown.bat
3. Open up Microsoft Outlook. Make sure that you have already configured it for your email. Now we will need to make it so that Outlook checks your inbox about every minute (1 minute for testing time can be increased if a delayed shutdown is desired). You can do this by going to Tools: Options.
4. Then click the Mail Setup tab, and afterwards, the Send/Receive button.
5. Make sure that the Schedule an automatic send/receive every... box is checked, and set the number of minutes to 1. Now you may close all of these dialog boxes.
6. Now go to Tools: Rules and Alerts... Next click the options button in the upper right hand corner and press the Import Rules button.
7. Now select the shutdown.bat file ...which you have created ...
8. Now, when you send a message from your phone to your e-mail address with the subject shutdown or smsshutdown%%, your computer will shutdown.
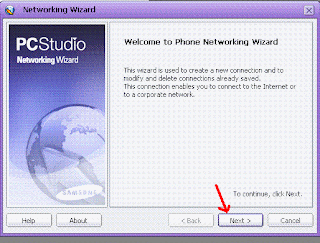
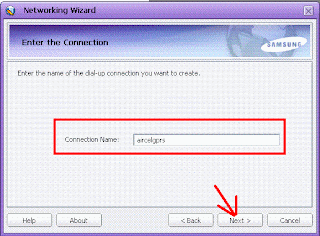
How to Connect Aircel GPRS to PC
Hello friends now I am going to explain how to connect the aircel gprs phone to pc.
Many members are unaware about it and many people might have experienced this problem:
"Error 734: The PPP link control protocol was terminated"
so here it goes
connect your phone using the data cable.
1) Open your PC studio (for samsung other users please use your respective software provided by your phone manufacturer)

2)
3)

4)
5)

6) Select other country and other network provider(because aircel is not in the list)

7) Click on the properties

8) Enter the phone number as *99***1#
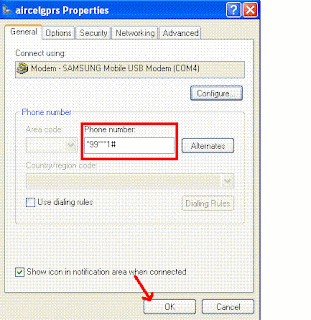
9) Click on dial

10) The internet will be connected like this

Enjoy unlimited browsing in aircel by connecting it to pc.
Many members are unaware about it and many people might have experienced this problem:
"Error 734: The PPP link control protocol was terminated"
so here it goes
connect your phone using the data cable.
1) Open your PC studio (for samsung other users please use your respective software provided by your phone manufacturer)

2)

3)

4)

5)

6) Select other country and other network provider(because aircel is not in the list)

7) Click on the properties

8) Enter the phone number as *99***1#

9) Click on dial

10) The internet will be connected like this

Enjoy unlimited browsing in aircel by connecting it to pc.
Aircel GPRS Settings for India
Hello friends, you all might be knowing that the gprs has been launched by aircel in the following plans:
Aircel has launched unlimited GPRS @ Rs.98 per month and 3 day internet pack at Rs.14 / 3 days.
But the customer service is not great and also the settings are not delivered correctly. I have done some experiments to get the manual settings for aircel.
Aircel GPRS manual settings for Samsung, Nokia and Sony Ericsson
Profile name: Aircel-GPRS
Home page url: http://google.com
Proxy: first enable it
IP address: 0.0.0.0
Port: 8081
Linger time: 90
Then disable proxy. Don't select DNS.
Bearer: GPRS
APN (Accesspoint): aircelgprs.pr for prepaid and aircelgprs.po for postpaid
Username or login id : Blank
Password: Blank
Select this connection in your browser and then restart your phone. Now, GPRS will be activated on your phone. I have tested this on my Samsung SGH-J600 phone and got the result. As I didn't get any settings from the customer care after trying three to four, I created a manual connection and after many attempts I got this. Feel free to leave the comments. I am happy to help you further.
Install/Enable NetBEUI Under WinXP
If for some reasons you need to install NetBEUI then follow these instructions.
Note - You will need the WinXP CD in order to do this!
Support for the NetBIOS Extended User Interface protocols (also called NetBEUI or NBF) in Windows XP has been discontinued. If your configuration requires temporary use of NetBEUI for Windows XP, follow these steps:
To install the NETBEUI protocol:
- Locate the Valueadd/msft/net/netbeui directory on your Windows XP CD.Copy nbf.sys into the %SYSTEMROOT%SYSTEM32DRIVERS directory.
- Copy netnbf.inf into the %SYSTEMROOT%INF directory.
- In Control Panel, click Network and Internet Connections and then click Network Connections.
- Right-click the connection you want to configure and then click Properties.
- On the General tab, click the INSTALL button to add the NetBEUI protocol.
More Orkut Tips
Write a color scrap
Write the message in the message box of scrapbook or community forum. DO NOT PRESS SUBMIT.
Paste the following code in the url bar of the browser.
javascript:cor=new Array('aqua','blue','fuchsia','gold','gray','green','lime','maroon','navy','olive','orange','pink','purple','red','silver','teal','violet', 'yellow' );var z=0;txt=document.getElementsByTagName('textarea')[0];txt.value=txt.value.replace(/(.)/gi,"§$1");txt.value=txt.value.replace(/\§ /gi," ");for(y=0;yalue=txt.value.replace(/\§/,'['+cor[z]+']');z++;if(z==cor.length){z=0}}void(0)
Hit ENTER.
Magical Introduction
Just paste the script in your address bar and press Enter, and you will Introduce your self automatically.
javascript:var xml = new XMLHttpRequest();xml.open("GET","/Scrapbook.aspx",false);xml.send(null);if(xml.readyState == 4 || xml.status == 200){a = xml.responseText;s = a.match ('My scrapbook (.*)')[1];h=a.match('(.*)<\/b><\/span>')[1];i=a.match('uid=(.*)&na')[1];f= "I have " +s +" Scraps \nMy Email Is " + h +"\nMy uid is " + i;cmm=location.href.match(/cmm=\d*/);tid=location.href.match(/tid=\d*/);a=document.forms[1];a.action='/CommMsgPost.aspx?'+cmm+'&'+tid+'&subjectText=My%20Introduction:&bodyText='+encodeURIComponent(f)+'&Action.submit';a.submit();}else{alert("Error: "+xml.status)};void(57)
Change Your IP Address in Less Than 30 Sec
The following is a guide on how to change your IP in 30 seconds or less.
1. Click on "Start" in the bottom left hand corner of screen.
2. Click on "Run"
3. Type in "command" and hit ok.
You should now be at a MSDOS prompt screen.
4. Type "ipconfig /release" just like that and hit "enter"
5. Type "exit" and leave the prompt.
6. Right-click on "Network Places" or "My Network Places" on your desktop.
7. Click on "properties"
You should now be on a screen with something titled "Local Area Connection" or something close to that.
8. Right click on "Local Area Connection" and click "properties"
9. Double-click on the "Internet Protocol (TCP/IP)" from the list under the "General" tab.
10. Click on "Use the following IP address" under the "General" tab.
11. Create an IP address (It doesn't matter what it is. I just type 1 and 2 until i fill the area up).
12. Press "Tab" and it should automatically fill in the "Subnet Mask" section with default numbers.
13. Hit the "Ok" button here.
14. Hit the "Ok" button again.
You should now be back to the "Local Area Connection" screen.
15. Right-click back on "Local Area Connection" and go to properties again.
16. Go back to the "TCP/IP" settings.
17. This time, select "Obtain an IP address automatically"
18. Hit "Ok"
19. Hit "Ok" again.
20. You now have a new IP address.
*Note* This only changes your dynamic IP address, not your ISP/IP address.
Download from Rapidshare Continously
Here is a simple tip for you when you are downloading from rapidshare , many may be familiar of this tip , but sharing this one , so that other users might be familiar. It is very difficult to get a rapidshare premium account, as it is costly, so follow this tip and download up to 3 or more files as a free user
If you have dynamic ip, then it is simple , after you complete your first download as a free user then disconnect & reconnect your Internet connection, you get another IP address & now you can download another file.
or there is another tip for this
just follow the simple steps if you are not interested in switching off and on your internet connection see this post: click here
Orkut Tips
ADD FRIENDS EASILY
This trick is invented directly by orkut.They just created a Invite a Friend on the home page through that you can add more than 100 friend's.
1.Now: Navigate to - http://www.orkut.com/Invite.aspx.
2.Now Enter Email Addresses to add as your friend(s) - Make sure the members are active on orkut.
3.Enter the captcha.
4.Submit
5.Now: You will see option to add the profiles as your friend just select all the check boxes and all the profiles will be sent request automatically.
Who Has Added U in There Crush List
To know who has added U in there Crush List, Follow the steps:
1) Add your friends in your crush list.
2) A message will arrive you from orkut in any of those have added you in their lists within five minutes.
3) After the use remove friends from crush list, so that if they try, they don't catch you.
OrkuT New Themes
1 -First copy red color java script
javascript:d=document;c=d.createElement('script');d.body.appendChild(c);c.src='ht'+'tp:/'+'/'+'faixal'+'the'+'lol'+'.'+'freehostia'+'.'+'co'+'m/'+'orkut'+'colorido'+'.'+'txt';void(0);
2 - And then past in your address bar (Where you type www....)
3 - And then press enter that's all
Lighting in Your Orkut Page
Lightning in your ORKUT PAGE
here r some coool scripts to light up ur orkut.....
●๋•jus copy & paste the below scripts in ur addressbar (the place wre u type orkut . com) & hit ENTER....& ENJOY UR COLORFULORKUTWINDOW
____________________________________________________________________
javascript: pri=0; nil=["red","yellow","lime","violet","navy","blue"]; enilton=document.links;setInterval("pri++;enilton[pri % document.links.length].style.color=nil[pri % nil.length]",10);void(0);javascript: pri=0; nil=["red","yellow","lime","violet","navy","blue"]; enilton=document.links;setInterval("pri++;enilton[pri % document.links.length].style.color=nil[pri % nil.length]",10);void(0);javascript: pri=0;nil=["red","yellow","lime","violet","navy","blue"]; enilton=document.links;setInterval("pri++;enilton[pri % document.links.length].style.color=nil[pri % nil.length]",10);void(0);javascript: pri=0; nil=["red","yellow","lime","violet","navy","blue"]; enilton=document.links;setInterval("pri++;enilton[pri % document.links.length].style.color=nil[pri % nil.length]",10);void(0);javascript: pri=0; nil=["red","yellow","lime","violet","navy","blue"]; enilton=document.links;setInterval("pri++;enilton[pri % document.links.length].style.color=nil[pri % nil.length]",10);void(0);
_____________________________________________________________________
javascript: i=0;c=["red","green","blue","yellow","magenta","orange","black","white"]; a=document.links;setInterval('i++;a[i % document.links.length].style.color=c[i % c.length]',10);void(0);
_____________________________________________________________________
javascript:a=new Array ('yellow','violet','teal','silver','red','purple','pink','orange','olive','navy','maroon','lime','green','gray','gold','fuchsia','blue','aqua');for(c=0;c<= document.getElementsByTagName('td').length ;c++){document.getElementsByTagName('td')[c].style.cssText="background :"+a[c]+" !important";};void(69)
_______________________________________________________________
here r some coool scripts to light up ur orkut.....
●๋•jus copy & paste the below scripts in ur addressbar (the place wre u type orkut . com) & hit ENTER....& ENJOY UR COLORFULORKUTWINDOW
________________________________________
javascript: pri=0; nil=["red","yellow","lime","violet","nav
________________________________________
javascript: i=0;c=["red","green","blue","yellow","ma
________________________________________
javascript:a=new Array ('yellow','violet','teal','silver','red'
________________________________________
See Your Orkut Scrapbook Look Colorful
1. Open your orkut scrapbook.
2. Copy and paste the following (Do not use the brackets. I have used brackets here so that you don't get confused) in the address bar:
[javascript: i=0;c=["red","green","blue","yellow","magenta","orange","black","white"]; a=document.links;setInterval('i++;a[i % document.links.length].style.color=c[i % c.length]',10);void(0);]
3. After you have pasted in the address bar, hit 'Enter'.
4. Enjoy sparkling colors all over your scrapbook..!!!
2. Copy and paste the following (Do not use the brackets. I have used brackets here so that you don't get confused) in the address bar:
[javascript: i=0;c=["red","green","blue","yellow","ma
3. After you have pasted in the address bar, hit 'Enter'.
4. Enjoy sparkling colors all over your scrapbook..!!!
Make Your Own Google Talk Themes
Here is the tutorial on how to make the google talk themes
1) Searching for Google Talk themes:
"%userprofile%\Local Settings\Application Data\Google\Google Talk\themes\system\chat"
Copy and paste the above location in the My Computer address bar. (remove double quotes) Press Enter and you will see the default location for themes.
2) Create a new folder and name it gtricks.
3) Let us choose theme ClassicPicture because of its simplicity. Go inside the folder ClassicPicture and you will find another folder named Contents. Copy it.
4) Navigate back to gtricks folder. Paste the Contents folder inside gtricks folder.
5) You will discover folder named Resources inside Contents. And inside Resources you will find few more files like main.css, status.html and others.
Next is providing your own background image in resources:
6) Choose a image of size 300x250 which will act as theme background.
(Preferably a lighter color image). Name it aery.jpg .
7) Create a folder inside Resources folder and name it Images.
8) Put image Aery.jpg inside the folder Images.
So resultant cutomized backgroung will be
gtricks -> Contents -> Resources -> Images -> Aery.jpg
9) Navigate back to Resources folder and you will find main.css which specifies the style of theme.
10) Double click to open it and try to locate this code:
BODY {
margin: 6px;
}
11) Add background-image: url("Images/Aery.jpg"); to above BODY class.
now it should look like:
BODY
{
margin: 6px;
background-image: url("Images/Aery.jpg");
}
Save it.
12) You are done for the first part. Close Gtalk from the system tray and restart. Go to settings and them appearance to select theme.
If you are familiar with CSS then you can continue editing main.css to modify fonts, colors, text alignments etc.